Archive for October, 2008

31
Oct
08

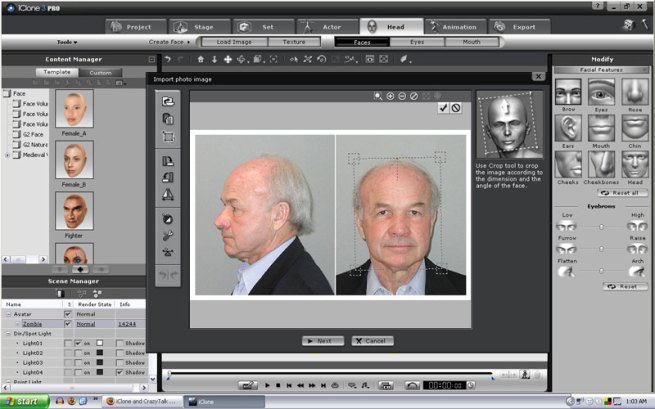
MugShots, not just for Cops and Robbers anymore! How and Why they are great for casting in iClone3

Look to the right, now straight ahead please. Great, now make a Facial Texture with your Mugshots

Look to the right, now straight ahead please. Great, now make a Facial Texture with your Mugshots

Hello iCloners, today’s tip is one of my personal favorite techniques I have used many times when putting together my cast of Iclone misfits. It’s funny too, because this source of image references is a bottomless pit of content, that’s right…Mugshots. Using Mugshots to texture faces in iClone3 may not be the most agreeable, or moral way to find freaking awesome and pre-aligned photos of some seriously odd looking characters, but you can’t argue that it provides a perfect solution in casting your iClone ani-movies for many reasons. Allow me to give you just a few examples…

1) Mugshots often times provide both frontal and profile images

2) Mugshots mostly have people with closed mouths perfect for fitting and facial animation

3) Mugshots can be found of everyone from miscellaneous persons to the most exclusive of celebrities (everyone is fair game)

4) Mugshots are easy to change slightly in Photoshop or other editors to protect the persons identity…(and yourself)

This list could go on forever, but for this tip I will quickly show you how and where to find and fit Mugshots to characters in iClone. There are a variety of websites out there that have Mugshots images that you could harvest this sort of thing from, or let’s face it, you can just Google these perps with ease as well. But, if you want my advise no one does it better than the good people at http://www.TheSmokingGun.com Yep, TSG has long been one of the tricks up my sleeve and as my last Happy Halloween treat to you ghouls and gals out there this year I give to you all this bounty. Follow the steps below to retrieve some great Mugshots or watch the high-speed video build below.

  • Go to http://www.thesmokinggun.com
  • Click Mugshot Mania
  • Select a Mugshot
  • Right Click the image
  • Select Save Image As
  • Name and Place the image
  • Open iClone
  • Go to the Actor tab
  • Select the Avatar button
  • Load a Character into the scene, for this example I use the Zombie (from the Classic Horror Movies content pack by Reallusion…sorry, sorry, I can’t help myself I just love that pack to death!)
  • Click the Hair tab
  • Select the Remove button in the Modify panel
  • Click the Head tab
  • Click the Load Image button next
  • Navigate to your saved Mugshot
  • Begin with the Front image and use the Crop tool to isolate the Face
  • Click the Next button
  • From the Face List select Male for this example
  • Edit the Outline Box to fit the Face
  • Click the Next button
  • Rotate and Edit the Mask to fit the Face Orientation
  • Click the Next button
  • Match the Feature Points to the Eyes, Nose and Mouth
  • Click OK
  • Click the Edit Profile button
  • Select the Open Image button
  • Click Yes
  • Navigate to your saved Mugshot once again
  • Use the Crop tool to isolate the Profile
  • Click the Next button
  • Scale and Rotate the Outline Box to fit the Profile
  • Click the Next button
  • Match the Feature Points
  • Adjust the Blend Lines
  • Click OK
  • Name and Save the new Face
  • Edit the Eyes, Teeth and Facial Features to further customize the 3D Mugshot

Castings Actors and creating facial textures using Mugshots will provide you with countless hours of lonesome giggling behind your screen until 5AM just finding the ones you like most. It’s a mindless self indulgence for me somewhat that just so happens to yield some pretty cool 360′ textures while you surf and collect. But seriously, who has the time to texture say a city block full of people, but c’mon, you don’t want to see Trey and the gang in every iClone movie out there do you? Well here’s what you do, take an evening and just use this Tip o’ the Day to create say 20 Faces randomly and I will promise you that they will come in handy over and over again. Remember folks, it’s all in the little details, you wouldn’t want to go 99% of the way with your films just to have people pick apart your artwork based only on the fact that default content was used here and there. Go the extra step in the finer points and you are sure to excel as independent directors. In the high speed video example there is a tiny render of a real-time Bum, who was once a real-life infamous CEO, see if you can pick this Mugshot out of the real-time lineup. Enjoy!
30
Oct
08

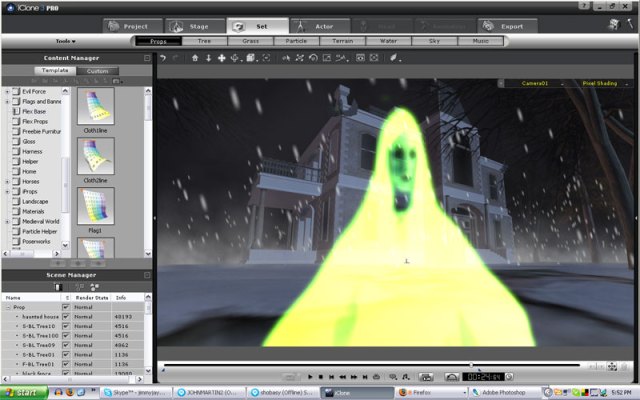
Haunted House 3D elements, Wicked Witch with Particle trails in iClone3

Spread the Halloween spirit around with Particle Trails in iClone3

Spread the Halloween spirit around with Particle Trails in iClone3

Greetings my pretties…I mean iCloners, sorry got Wizard of Oz on the brain, which is what inspired today’s tip, creating Particle Trails in iClone3. In iClone you can attach Particle Emitters to moving objects in order to react to the movement of that prop or character. This is a great way to create custom situations such as a trail from a jets afterburner, or a tire track from a vehicle moving through the mud, or in this case a bit of Halloween magic falling to Earth from the broomstick of our Witch avatar. How does this sort of tip benefit you the user, well, it’s simple, again this is something that enhances the small details in the scene to help “sell” the scene to the audience. The more eye candy you include in any given scene, the more your viewers will enjoy watching your movies and from time to time, it just may cause them to come back and watch again to see these small but important details in action. To attach an emitter to an object in motion, follow the steps below, or watch the high-speed video build.

  • Load an Avatar into the scene
  • Position and Animate the avatar or object you wish to have Particle trails (a Plane vehicle helper was used to animate the Witch in this tutorial)
  • Click Play to view
  • Click the Set tab
  • Select the Particle button
  • Click the Template tab
  • Choose a Particle template, in this tip I customize the Magic Waterfall for our Witch
  • In the Modify Panel, select the Pick Parent button to attach you emitter to the character
  • Click the Lower Torso of the character
  • Click Play to view, notice the emitter color and alignment which will be edited to fit the
  • Under the Color section, click the color swatches to edit the Particle color to suit your scene
  • Click Play to view the edited Colors you have selected and applied to the character
  • Scroll down & edit the X and Y axis Position values to 0 to move the emitter into place
  • Make sure your Gravity on the Z axis is set to a negative number so that the Particle will flow down
  • Click Play to view the Particle Trail now produced as your Witch character flies around
  • Select the Add button under the Content Manager to save the custom Particle template

The Witch avatar featured in this Haunted House 3D elements tip is a bit of Bonus content you get when you purchase the Classic Horror Movies content pack from Reallusion, which is breaking tons of new film-making ground with all the new and impressive iClone Horror Ani-movies emerging out there. Make sure to check out David Thomas’ Distrubing Experience, a horror film made in iClone3. This is David’s first film made with iClone3. Warning: Contains totally awesome and masterfully EXECUTED graphic violence. Dave, if your out there man, my hat is off to you. Not only can you make a kick-ass Hamburger, but you can also rock some serious iClone.

See it at http://www.animizemedia.com/wordpress/?p=111

This is also the final Haunted House 3D elements Tip of the Day so I hope you have enjoyed this seasonal approach to an assortment of tips. Please let me know how you good people out there feel about it and if I hear good things I will continue to produce theme oriented tips in numbers from time to time. Plus I’m a Halloween junkie so you can bet on seeing a new set of these annually for sure. Thanks again for tuning into iClone Training and enjoy the high speed video build below showcasing the Particle Trails method in action along with a fly-by Salem style!

27
Oct
08

iClone Innovators, focusing on users who blaze new trails in Machinima

Animals in iClone, sound to good to be true? Not to Duchess, a true iClone PowerUser

Animals in iClone, sound to good to be true? Not to Duchess110, a true iClone PowerUser

Hello iCloners, this post is something new that I am going to do from time to time, which is showcase an iClone or CrazyTalk PowerUser out there who’s work and innovative techniques have caught my eye. This is something that I think will help to educate other users on some of the often to many times awesome methods that get lost in the shuffle. The first iClone Innovator I would like to tune you guys into is a user who emerged from CoolClones.com who produces under the handle Duchess110. Recently I found myself in a bind for a high-end production that called for a couple of animals other than horses. After reading some stuff on the Reallusion forum I was turned on to Linda (Duchess110) and some new character rigging methods she had been testing and developing. She had been deep in the throws of solving the “animal in iClone” issue already and was happy to help provide me with a working 3D Camel avatar created using here new recipe. Yes, I said Avatar, complete with bones and IK abilities. I was floored by her results, to the point I felt it time to start sharing some of the truly exciting creation techniques and the artist who dream them up.

Elephant Avatar complete with IK bone structure ready for animation on the real-time stage by Duchess

Elephant Avatar complete with IK bone structure ready for animation on the real-time stage by Duchess

As a child I was fascinated by cartoons and the Walt Disney Films and never in my wildest dreams did I ever think that there was a possibility of me being able to do that!“…Linda

Duchess110 is a perfect example of someone who threw off the weight of working day to day on a computer and embraced the love of producing artwork on one on a regular basis. She tinkered around with other programs such as Daz and Poser, but it was iClone she fell in love with like so many other of us out there. The user-friendliness and overall deep understand shared openly by the user-base was enough to get Linda to enter iClone and never leave. She has been involved with the CoolCreators and notes Rainman, Wolfzone, Warlord and a few other artist there as being inspirational artist that have helped her in her pursuit of real-time enlightenment. Linda is sure to continue to produce awesome content and walk to the beat of a different drummer where experimental development techniques are concerned. Below is a collection of links to some of her movies and then of course, screen shots here showcasing the Elephant and Rhino characters she has already unleased. Keep an eye on this user because she defines what is possible when you push iClone to the virtual limits and then see what happens when you go over the edge with your artwork. Keep it up Duchess and I will be sure to keep watch of your progress, I’m sure it will be stunning. If you know an iClone or CrazyTalk Artist out there that needs a little spotlight, contact me here at the blog and supply some links, shots, vids or VNS files of some work and I will do the rest. Thanks again everyone and keep the clone’n alive.

http://www.coolclones.net/duchess/cc4u/Turkish-Delight.wmv
(made all scene props clothes etc for this)

http://www.coolclones.net/duchess/projects/CloneBones.wmv
(made the clone bones characters)

http://www.coolclones.net/duchess/projects/Elephants.wmv
(showing how Elephants could work within iClone)

http://www.coolclones.net/duchess/projects/Halloween-Party.wmv
(Frank was made by another Cool Creator but I did all others.
The Gremlin was a Daz Character I got in and he can wiggle his toes I did show some movement but not much)

These video are videos Duchess created during beta testing and have never been viewed before now

http://www.coolclones.net/duchess/projects/War-Of-The-Worlds-Intro.wmv
(Where I was testing out look at)
http://www.coolclones.net/duchess/projects/YOU-ARE-MY-WORLD.wmv
(Just seeing what I could do and using the flex cloth as a skirt)

http://www.coolclones.net/duchess/projects/heartache-avenue.wmv
(Just trying out animation)

22
Oct
08

Haunted House 3D elements, Non-traditional character creation in iClone3 – Charon the FerryMan

Charon the FerryMan avatar created in iClone3...better have your 2 bits!

Charon the FerryMan avatar created in iClone3...better have your 2 bits!

Hello iCloners, today’s tip is a hot one. I have produced a few custom character creation methods based on the new features in iClone3 and the power that they give the casting director, but…the Tip of the Day, today will teach you a Non-traditional character creation method by developing a Greek mythological favorite of mine. Charon, the Ferryman was the son of Hades, condemned to carry souls across the river Styx for all eternity. This character you also may recognize as what we have commonly come to know as the traditional design for the Grim Reaper, or Death. And, let’s face it, it’s just not Halloween without the Harvester of Sorrow. He has a black cloak, complete with hood, and a Skull for a face, which when you think about it may give you a bit of an issue if you would like a seamless representation of the character in iClone. Why? Because , if you used Clonebones to make this, then you would not have the benefit of the mesh deforming in the cloaked areas of the body. But, if you use say a CloneCloth template to solve this issue, you still must replace the head somehow with a Skull model. Well, this is the iClone Trick and the Treat because that’s exactly what you have to do, first decapitate your character before attaching a Skull. Here’s how, follow the simple steps below to produce Charon, the Ferryman using non-traditional character creation methods or watch the high speed video build.

  • Go to the Actor tab
  • Click the Avatar button
  • Load a character into the scene, for this example I use the Jack CloneCloth Overcoat template
  • Select the Hair button
  • In the Modify panel click Remove to delete the hair model
  • Click the Upper Body button
  • Adjust the Brightness slider to a Low setting making the entire robe Black, you can also add a custom texture here for added detail if you like by clicking the Launch button to edit or the Open button to apply a custom image
  • Slide the Contrast slider to a high setting to further edit the texture directly inside of iClone
  • Click the Skin button next
  • Scroll down in the Modify panel and select the Shoes Material
  • Click the Open button and place a Solid Black image over the Shoes image template
  • Choose Hands from the Material Settings portion of the menu
  • Scroll Up and adjust the Brightness slider to a High setting to make the Hands Solid White
  • Click the Avatar button
  • Select the Dummys Left or Right Hand in the Modify Panel and then check the Mirror check-box
  • Use the Length slider to stretch the Hands
  • Under the Finger section of the menu, click the Mirror check-box
  • Select each Finger Tip one at a time
  • Use the Length slider to elongate the Fingers to make them more “bone-like”
  • Click the Head button form the top
  • Select the Texture button to launch the characters facial texture in iClone for editing
  • Choose the Opacity Map channel
  • Use the Brush Size slider and set it to 100%
  • Make sure you have Solid Black selected and then paint over the entire image map
  • Click OK to apply the edit to the Head of the character
  • Select the Set tab
  • Click the Props button
  • Choose the Custom Folder
  • Locate and Load a custom Skull 3D model
  • Right Click the Skull
  • Select the Attach button
  • Click the Head area of the avatar
  • Wait to see the Bounding Box flash to indicate a successful link
  • Use the Move tool to properly position the Skull in the Head placement
  • Select the Eyes button
  • Choose an Eye Template
  • Use the tools in the Adjust Size portion of the menu to edit the placement and size of the eyes
  • Click the Mouth button
  • Click the Remove button to get rid of the teeth completely
  • Select the Throat bullet
  • Adjust the Brightness slider to 100% making the Throat Solid White
  • Select the Set tab
  • Click the Props button
  • Choose the Custom Folder
  • Locate and Load a custom Hood 3D model
  • Right Click the Hood
  • Select the Attach button
  • Click the Head area of the avatar
  • Wait to see the Bounding Box flash to indicate a successful link
  • Use the Move tool to properly position the Hood in the Head placement
  • Click the Add button under the Content Manager to Save the character
  • Name the new Haunted House 3D element

Using Non-traditional character creation methods in iClone3, like Charon the Ferryman can amaze you from time to time by trying new and exciting combinations when designing these sort of avatars. You will be surprised at how well some of your more outlandish ideas will turn out if you just step outside of the box for a minute when approaching the conceptual portion of your creation process. This Opacity material method where only certain areas of the avatar are rendered invisible lends itself to many different themes and styles. Maybe you want to expose some bones from a large wound, or create a clone that has maybe one cyborg arm, the development options begin to open up a bit wider when you think about your characters in this light. Go crazy, I do, and I can create tons of designs in small amounts of time with some of these rouge techniques when I happen upon them in production. Below is a high-speed video build showcasing exactly how this character is put together using these methods, but feel free to enhance this idea and go deeper into your texture design phase. In the end…you will thank yourself for taking the time to do so, and in the end…you don’t want to fear the Reaper! BOC, that’s right! Enjoy!

21
Oct
08

Haunted House 3D elements, Detailing your own Tombstone with Diffuse and Bump Maps in iClone3

Engrave your eternal words and designs with Diffuse and Bump Maps

Engrave your eternal words and designs with Diffuse and Bump Maps

It’s nice to see all of you iCloners here today, we are gathered to pay respects to the iClone Tip of the Day, which focuses on how best to use Diffuse and Bump Maps together to create detailed Tombstones in iClone3. Certain objects such as graves can be created with relatively simple objects and shapes. Most head stones are little more than a slightly modified rectangular 3D block, which allows users to develop vast amounts of these simple objects in a scene, but from time to time, even the most simple of objects can use additional detail to help enrich the scene and overall quality of the prop. This is where proper use and combination of Diffuse and Bump Maps can make all the difference in a project, adding tons of detail with no high polygon count worries. To customize you own Tombstones follow the steps below or watch the high-speed video build.

  • Go to the Set tab
  • Click the Props button
  • Select the Template folder
  • Choose the 3D Blocks – Arc folders
  • Double click to load the Arc_001 into the scene to become your Tombstone
  • In the Modify panel, scroll down and with the Diffuse Map selected click the Open button
  • From the iClone texture template folder, choose the Stone folder
  • Apply any Stone texture map you wish
  • Select the Bump Map to activate it
  • Click the Open button
  • Again from the iClone texture template folder, choose the Bump folder
  • Select an image you would like to detail the Tombstone with
  • Under the UV Material Settings portion of the menu choose BOX UV type
  • Set a rotate value to 270
  • Click Apply
  • Click the Add button in the Content Manager to save your new prop

Creating and Detailing a Tombstone in iClone3 is a quick and easy process that can be completed 100% inside iClone alone, no outside software needed what-so-ever. Often I will show users how to gain resources from other places but, in this tip you can really create quite a few simple shaped objects to accomplish a Tombstone directly from the 3D Blocks folders. There are things like Crosses you will find as well that can help to round off your cemetery. Sometimes, a short and simple solution to production issues that require large amounts of objects like graves can still carry high detail with the low poly-count combination to keep your projects slim and efficient. Below you can see the high-speed video build and a render example of how just a few Haunted House 3D element designs can provide you a rich and full framed scene in iClone3, a ghoul or two couldn’t hurt either. Enjoy!

18
Oct
08

Haunted House 3D elements, Mastering Falloff and Decay Lighting in iClone3

Master the art of Falloff Lighting and become a horror master in minutes

Master the art of Falloff Lighting and become a horror master in minutes

Don’t move, don’t even breath, because today’s tip is one that just might jump out of the dark and take you by surprise. Dark detailed lighting has played a key role in some of the best horror movies out there ever put to film, that’s a fact. Masters of the art such as Carpenter, Barker, Zombie, Romero have used this ability to create an aesthetic completely with simple and deep lighting or in some cases the lack there of. An entire Slasher style Stab’em up industry has been built on these most basic and holy of film-making techniques. Today’s tip reveals how to master Falloff and Decay Lighting by creating another 3D element that you will find in 90% of all horror films in the world, a Flashlight, but here’s the awesome aspect to this one iCloners, this 3D Flashlight will actually work. Using custom lighting settings, a custom flashlight model, a glow object and a 3D cone light prop to accomplish this is simple and highly effective. I was greatly impressed by the level of realistic lighting that this combination of objects was able to produce the first time I tried to create it, so much so that I wanted to share it with all the users out there instantly. I wanted to merge a functional 3D Flashlight to accompany the many insanely cool props and accessories included in the Classic Horror Movies content pack, I mentioned this new addition to the Reallusion library in my last post and since then have put together a couple of scary movie clips using basically only a few of the many prop and set choices from the new pack, and one or two elements I felt needed to be a little bit more reactive to up the fear factor a notch or two such as a Falloff Flashlight. To make a 3D Flashlight of your own follow the steps below or watch the re-formated high-speed video build where now you will see the render example at the beginning of the video so that you get a perfect idea of the kind of effects you can accomplish with this iClone Tip of the Day.

  • Open 3DXchange
  • Click the G icon to launch Google 3D Warehouse
  • Type in keyword Flashlight
  • Search until you find one you like
  • Click Download Model
  • Click the Align to Center button
  • Use HotKey: Ctrl + E to Export
  • Name the new flashlight
  • Select the Props bullet
  • Choose a folder destination
  • Click OK to successfully Export
  • Enter iClone
  • Go to the Set tab
  • Click the Props button
  • Select the Custom folder and retrieve the 3D Flashlight
  • Click the Template tab
  • Select the 3D Blocks folder
  • Choose the Capsule sub folder
  • Place a Capsule_009 model into the scene
  • Use the Move and Scale tools to size and position the 3 Block inside your Flashlight
  • Click the Glow Map in the Modify Panel
  • Apply the desired Colored image map to the object
  • Make sure Pixel Shader is turned on to view the effect
  • Right Click the new Glow Object and select Attach
  • Click the Flashlight, notice the bounding box flash to indicate a successful link
  • Again load a new 3D Block into the scene, this time choose a pointed Cone object
  • Use the Move and Scale tools to size and position the 3 Block in front of your Flashlight
  • Click the Diffuse Map in the Modify Panel
  • Click the Launch button to open the map template into an external image editor
  • Create an Opacity map by painting in Black and Grey accordingly
  • Name and Save the new Opacity map
  • Return to iClone
  • Click the Open button and apply the new Opacity file to the light cone object
  • Right Click the new Cone Object and select Attach
  • Click the Flashlight, notice the bounding box flash to indicate a successful link
  • Go to the Stage tab
  • Select the Light button
  • Click the Spotlight bullet
  • Use the Transform abilities to point the Spotlight out and align it with the Flashlight
  • Select the Pick Parent button
  • Click the Flashlight, notice the bounding box flash to indicate a successful link once again
  • Select the Link to Sub Node icon
  • Check on the Align Position to Parent button
  • Turn on the Decay light by clicking on the box
  • Then set the Fallof setting to a value of 1 or 2 to create a hard edged light beam
  • To hide the linked Spotlight, click the Show check mark in the Scene Manager
  • Move and Rotate the 3D Flashlight and notice the light will move a react with the new set up

Imagine this, you have an entire scene set up for animation, all your actors blocked and animated, then you turn out the lights and apply your functional 3D Flashlight to the hand of an actor or actors in the project and with a couple of lighting situation changes, all the sudden, the only things you can see in your scene are illuminated by the beam of the flashlight. Allowing your serial killer to hide just out of site of the camera, or your victim to crouch and wait in the shadows. Setting up a simple but functional prop like this that literally controls your lighting scenario creates a whole new feel and dynamic to the scene immediately! Linking a Custom Spotlight to a specific object such as a 3D Flashlight combined with some of the other techniques such as developing Glow Objects, showcased in previous Haunted House 3D elements posts here at the blog, will cover all the bases an iCloner would need to ensure a high level of realism in the lighting prop and how it effects the scene. Below is a video short that I produced with the Classic Horror movies pack and this new 3D Flashlight technique, throw in a little Halloween audio and you have the ingredients to make something scary. Check it out and enjoy!

13
Oct
08

Haunted House elements, Re-animated Skeletons created with CloneBones in iClone3

Skeleton CloneBones Character created with Google 3D Warehouse assetsq

Skeleton CloneBones Character created with Google 3D Warehouse assets

Salutations iCloners, today we raise the dead and re-animate the only thing we leave behind in this terrible ol’ world when we go, you got it, today’s tip focuses on animating Skeleton characters using CloneBones. That’s right, now dancing Skeletons aren’t just for the Grateful Dead, you too can make them dance, or fight, or just plain act like possessed beings from beyond the grave. It’s up to you using the power of CloneBones. How would this tip help to make your Halloween ani-movies better? Simple, imagine wanting to include a skeleton in your project that has all the animation abilities that a normal iClone avatar would, but not wanting to go through the tedious process that iCloners used to of having to create Opacity Maps from the head down for every body part to create things like the rib-cage. I get tired just typing it out, that’s why CloneBones are so cool, and so helpful when you get the bright idea to create what would seem to be such a simple character. Now it truly is simple to create these kinds of avatars, but wait…there’s more, you can also utilize the Jaw node or (bone) to attach a Jawbone in this case, so that your avatar can also have facial animation. So now you can have a singing and dancing skeleton in minutes inisde of iClone3. Eat your heart out Tim Burton. To harness the awesome power of CloneBones in order to create a Skeleton, you must also have a full set of human bones just laying around, so unless you are a serial killer or a grave robber, chances are your going to need to find a full body human skeleton. Well, don’t fret, your pal JimmyJames and the guys at Google 3D Warehouse have got you covered, just don’s ask any questions…got it. Follow the steps below to collect your assets and apply them to the CloneBones template or watch the high speed video build.

  • Open 3DXchange
  • Click the G icon to launch Google 3D Warehouse
  • Type in keyword Skeleton
  • Search until you find one you like, also you may have to try a couple of different ones to find a model that is broken up into the right sections, CloneBones can have objects attached all the way down to each finger tip, so having a SketchUp skeleton model that has all the pieces you need is essential.
  • Click Download Model
  • For a highly detailed CloneBone character animation, isolate the Head, Jaw, Neck, Upper Torso, Lower Torso, Pelvis, R n L Shoulders, R n L Upper Arms, R n L Lower Arms, R n L Palms, All Finger and Thumb sections, R n L Upper Leg, R n L Lower Leg, R n L Feet one at a time
  • Uncheck all areas that are not the focus of the Export, for example, when exporting the Skull, make sure all other bones are checked off, only the Skull node checked ON.
  • Click the Align to Center button for each bone everytime before you Export to iClone
  • Use HotKey: Ctrl + E to Export your Skeleton pieces one at a time
  • Name each body part specifically to keep the character assets organized
  • Select the Props bullet
  • Choose a folder destination, I recommend that you create a New folder for each CloneBone avatar, and export all assets pertaining to that avatar into that folder only to help maintain organization
  • Click OK to successfully Export
  • Enter iClone
  • Go to the Actor tab
  • Select the Avatar button
  • Load a Clonebones template
  • Go to the Set tab
  • Click the Props button
  • Load a prop into the scene you with to link to the actor (start with the 3D Skull and Jaw models)
  • Right Click each bone prop
  • Choose Link – Link to
  • Click the desired CloneBones node (such as the Skull to link the Head)
  • Locate and click the Link to Sub Node icon
  • Check Align Position to Parent
  • Position the prop directly on the node using the Move tool
  • Repeat for each body part
  • Make sure you have attached the Jaw Bone to the Jaw Node so that you can apply facial animation to your Skeleton
  • Select the CloneBones avatar in the Scene Manager
  • Go to the Animation tab
  • Click the Facial Animation tab
  • Choose or import a CTS file to review the Jaw animaiton
  • Then click the Add button under the Content Manager
  • Name and Save the CloneBone avatar

Haunted House elements such as animated Skeletons created with CloneBones are not just for your Halloween projects, no sir. They are custom characters that can be edited to become other character designs. Like, maybe this Halloween you have a brand spanking new skeleton avatar to animate with, but with a little more editing and a particle system, then you have Marvel’s Ghost Rider, or throw a Trojan helmet on top and give him a sword and shield and you have a mythological skeleton warrior guarding the gates of Medusa’s palace. Again, Reallusion has provided a powerful feature that opens up endless character creation options to users worldwide. Below is a high speed build of exactly how to isolate the bones and add them to the CloneBones template along with a rendered example of some character animation on our undead friend. Enjoy!

12
Oct
08

Haunted House 3D elements, Illuminated Jack-O-Lantern from Google 3D Warehouse to iClone3

Come on baby' light my pumpkin. Using Glow Objects in iClone3

Good Evening iCloners, well, todays the 12th of October, the second Sunday, and so marks the carving of the pumpkins for millions of people everywhere. There are also those of us who are chipping away at our virtual Halloween productions at the same time, and no matter what kind of scary story your working on, chances are if you don’t already have a few 3D Illuminated Jack-O-Lanterns in the scene, then you could use a few. Today’s tip reveals 2 methods, first harvesting our model from the vast library of free content provided in the Google 3D Warehouse, and second, using Glow objects along with Editing Materials and Specular and Glossiness settings to illuminate your pumpkin. Converting these assets with 3DXchange allows users to access a quick and easy pipe-line to port from the library to the real-time stage, it’s as simple as using keywords to search for what you want, in this case Pumpkin will do. I mean what do you expect? It’s Google, so you know it’s going to be easy and usually will locate exactly what you want the first time around. And again, like I have stated in previous posts, it is important to pay attention to the little details and give your scenes that “lived-in” look and feel to them. Your audience will thank you for it, even if they don’t know it. To get started, lets head to the ol’ Google pumpkin patch and pick a winner, follow the steps below or, watch the high-speed video build.

  • Open 3DXchange
  • Click the G icon to activate Google 3D Warehouse
  • Type in keyword Pumpkin
  • Search until you find one you like
  • Click Download Model
  • Once the model is in iClone 3DXchange, click the Align to Center and Align to Ground buttons
  • Use HotKey: Ctrl + E to Export your file
  • Select the Props bullet
  • Choose a folder destination
  • Click OK to successfully Export
  • In iClone, go to the Set tab
  • Click the Props button
  • Select the Custom tab
  • Locate the designated folder where the pumpkin model was exported into
  • Drag and Drop your new prop into the viewport
  • Scroll down in the Modify panel and find the Material and Texture Settings portion
  • Check on Effect All Materials
  • Click the Diffuse Color swatch
  • Choose an Orange hue from the color picker
  • Click the Ambient Color swatch
  • Choose an Dark Orange hue from the color picker
  • Click the Specular Color swatch
  • Select a color that will work best with your lighting scenario
  • Scroll down and adjust the Specular and Glossiness sliders, until you are pleased
  • Click the Template tab in the Content Manager
  • Locate the 3D Blocks folder
  • Load a Ball_01 prop into the scene
  • Use the Move and Scale tools to position the object inside the pumpkin you wish to light
  • In the Modify Panel, select the Glow map to activate it
  • Click the Open button to apply a colored texture map, an Orange or Yellow image work best for this
  • Right Click the Glow object and select Attach
  • Click the Pumpkin, a bounding box will flash to indicate a successful parent-child attachment
  • Select the Merge button, if you want to permanently combine the objects
  • Then click the Add button under the Content Manager to Name and Save the illuminated Pumpkin

Creating Haunted House 3D elements, like Illuminated Jack-O-Lanterns is essential to all Halloween animations, that is of course unless your going the more traditional horror or gore scenario. Even in the event you are, you still may want to include things like pumpkins to give your audience a sense of the season and set the tone of your film, it can never hurt. Adding additional effects to further the small details of the objects will also make for a richer and more appealing scene in the end. This is easily accomplished by getting to know and utilizing Material Editing techniques along with adding assets such as Glow Objects that are meant to serve a singular function in your project, to enhance the small details. That’s all, that’s the trick….or treat if you will. Below is a high speed video example of how to create an Illuminated Jack-O-Lantern from Google 3D Warehouse to iClone3 with a couple of props from the new Classic Horror Movies Content Pack which if you haven’t seen yet, let me just say…it is by far the COOLEST set of content I personally have ever seen emerge from Reallusion, and I can only hope, plead, hope and beg for more content in this style. It’s the sickest thing in real-time, seriously. Check it out at http://www.reallusion.com/contentstore/iClone/pack/ClassicHorrorMovies_Mockup/Mockup.aspx

09
Oct
08

Haunted House 3D elements, how to create Ghosts using Diffuse, Opacity and Glow maps with Flex Bases in iClone3

Ghost created with Flex Bases and custom Texture Map settings

Ghost created with Flex Bases and custom Texture Map settings

Greetings iCloners, today’s ghoulish tip is one that goes with my iClone Halloween screamfest and it focuses on something that a few of you may need this week for your Halloween Themed ani-movies, creating animated Ghost props using custom texture maps and Flex Bases. It’s obvious you can throw any old image on a 3D Block or surface and then add your Ghost image and Opacity and call it a day, sure. But, is that Ghost going to move, stretch and flex with your motion animation or wind settings? I think not, but using this fiendish method you will find that you will get a much more paranormal reaction from your Ghost and Spirits. It’s a an easy process and one I’m sure you’ll find many interesting uses for. Also, in a very strange way, because of the way we perceive the spiritual world to be, you are also creating super low-poly characters. To create a custom Flex Base Ghost of your own, follow the simple process below or watch the high-speed video build.

  • Go to the Set tab
  • Click the Props button
  • Select the Template tab
  • Open the Flex Base folder
  • Double click the Flex Base Template, for this example I am using
  • In the Modify panel scroll down and select the Diffuse Map
  • Click the Launch button to open the Flex Base Diffuse into an external image editor, for this example I am using Photoshop
  • Locate or create a Custom JPG Image to use as your Ghost or Spirit character
  • Open the image into your external image editor and Copy, and Paste over to the iClone Temporary image template
  • Use the Transform tools to properly fit the custom image
  • Save over the iClone Temporary image template
  • Return to iClone
  • Click the Update button to apply the edited Diffuse map to the Flex Base
  • Return to Photoshop
  • Use the new Diffuse map to create an Opacity Map
  • Select the area around your Ghost image with the Magic Wand tool
  • Fill with Solid Black
  • Strike Hotkey: Ctrl + I to invert your selection
  • Fill with Solid White
  • Go to File – Save As
  • Save as an newly named JPG file
  • Return to iClone
  • Click the Opacity Map to activate it for the Flex Base
  • Select the Open button
  • Navigate to your new Opacity Map
  • Double click to apply
  • Make sure the Strength slider is set all the way up for the Opacity Map
  • Click the Glow Map to activate it for the Flex Base
  • Select the Open button
  • Navigate to any custom or default colored Glow Map
  • Double click to apply
  • Use the Strength Slider to edit the amount of Glow effect that you wish for your Ghost to have
  • Once you are pleased with the map settings scroll down in the Modify panel and locate the Opacity slider and set a low Opacity setting for the entire material, this will make your Ghost transparent
  • Click the Flex Settings button in the Modify Panel
  • Edit the Flex Base settings to suit the motion of your Ghost
  • Click the Save Settings button to keep a record of the way this Flex Base reacts to this setting
  • Select the Close button at the bottom to close the menu
  • To save your new Custom Ghost Flex Prop click the Add button in the Content Manager

Haunted House 3D elements are gross amounts of fun to create and control in iClone3. There are a variety of new combinations of features and assets that when put together properly can totally accomplish some truly stunning visual effects. The same principle could also be applied to avatars as well to produce characters like the super-natural beings or even see-though cyborgs, or maybe communication holo-grams, again the options are endless for sure with this method. Plus, don’t forget, tis the season to be scary and take a chance or two. So break out of the norm and try to create that character this week you’ve had stuck in the back of your head, or see if that crazy idea you had about throwing a couple of props together will actually work. Flex Bases will give you the best outcome if you take this easy-going and adventurous approach I promise, give yourself the time to play around and go through some trial and error to make the Flex settings react the way you desire them to and you will see see something super, and maybe even super-natural. Muh Ha HA ha HA ah. (My best Vincent Price laugh) Below as always is a high-speed video example of how you too can resurrect a poltergeist or two if you like. Enjoy!

07
Oct
08

Reallusion’s iClone 3: The New Standard for Machinima

“I’ve been playing with iClone since version 1.5 and without reservation iClone 3 sets a new standard for machinima and the casual animator!”…Ricky Grove (gtoon)

Hey everybody, recently I got a chance to sit down and chew the fat with one of the true voices of the Machinima movement, Ricky Grove (gtoon), for an upcoming interview you guys are sure to hear more about in the near future. We had an awesome conversation that spanned everything from the Punk Rock birth of the DIY generation to the sometimes questionable and judgmental views that are taken in relation to some great films out there. It’s sure to have you nerding out right along with the two of us, but Ricky is also one hell of a writer and has put together a spitfire article at Renderosity.com about his thoughts and views on the new iClone 3 build. There’s also an audio interview with John C. Martin II from the Martin Bros. talking about the software we all know and love. You won’t want to miss this if you are a fan of Reallusion and the best real-time production tools on the market. Check it out at

http://www.renderosity.com/news.php?viewStory=14262


Ricky Grove [gToon], Staff Columnist with the Renderosity Front Page News. Ricky Grove is a bookstore clerk at the best bookstore in Los Angeles, the Iliad Bookshop. He’s also an actor and machinima filmmaker. He lives with author, Lisa Morton, and three very individual cats. Ricky is into Hong Kong films, FPS shooters, experimental anything and reading, reading, reading. You can catch his blog here.