Archive for December, 2008

24
Dec
08

Retrieving and Editing Materials with the Picker Tool in iClone3.1

Use the Material Picker to quickly edit or replace individual textures on all of your models

Use the Material Picker to quickly edit or replace individual textures on all of your models

What’s up iCloners? Today’s Tip of the Day is a tiny but powerful tool that again if you haven’t read deep into the 3.1 Updated Texture and Material editing features in the Online Beta index then you may have let this one slip by you. Let me ask you this, have you ever found a really nice Google 3D Warehouse model that you wanted to use but decided not to due to the poor texturing? Well, I know I have, that is until now. With the new Picker Tool you can simply click the texture you wish to enhance, edit or just plain replace and then do so using everything from the Materiall Library to all 6 channel maps and adjustable sliders. Sound good? I thought it might. So here’s how you do it for yourself, open 3DXchange and then choose a model you feel that is a great model geometrically but may lack in the texture department. For this example I use a 1957 Chevy Bel Air model from Google 3D Warehouse, but feel free to edit anything you like with this tip. Covert the model to a Prop file for use in iClone. Once you have it there you will begin to edit and enhance the overall look of the model dramatically, follow the steps below or watch the high speed video provided at the bottom of the post.

  • Go to the Set tab
  • Click the Props button
  • Select the Custom tab
  • Load your custom Prop, ( for this example I am using a 1957 Chevy Bel Air to covert it into a custom Low Rider )
  • Scroll down in the Modify Panel and locate the Material and Texture Settings portion of the menu
  • Click the Pick Eyedropper icon to activate the Picker Tool
  • Click any texture on the model you wish to begin editing, ( for this example I begin by editing the headlights of the car )
  • Select the Channel Map you wish to edit or replace, ( for this example I add a Glow Map to the Yellow Diffuse Map that is already in place )
  • Click the Open button to choose a custom image to apply to the selected Channel Map
  • Use the Strength Slider to adjust the intensity of the Map
  • Use the Brightness, Contrast, Hue and Saturation Sliders to make further adjustments if you like to any Map
  • Click the Pick Eyedropper icon once again and select an area you wish to add a preset Material to  ( for this example I applied a Glass Material to the Windshield and Windows of my model )
  • Select the Load Material button and make a choice of what will work best for that portion of your model
  • Repeat the process until each area of the model suits the design you have in mind

Retrieving and Editing Materials using the Picker Tool in iClone3.1 is a new solution to a old and fustraiting problem where 3D Warehouse has been concerned for sure. Often times you may see models import into 3DXchange with solid white areas that carry no texture or Material qualities over what so ever. Now it is true sometimes simply using the Reload button from the tool bar will help to fix texture fails from time to time, but, why waste time with redundant tasks when you can make what changes that need to be made using the Picker Tool with no fuss. If you want to check out additional information provided by Realluison on Multiple Channel Texture Mapping then visit the Online Beta Index. Or if you like, check out the little video example I have put together for you showcasing the method of how to best utilize the Picker Tool and how to take a sub-par car model and turn it into a pimped out virtual PW with the PT. Enjoy, and Happy Holidays to you all if you hear from Santa before you hear from JimmyJaymz again!

21
Dec
08

AML Templates – the Grab it Low Operate Dummy in iClone3.1

Use AML Templates for a solution to interacting with ANY 3D Object

Use AML Templates for a solution to interacting with ANY 3D Object

Hey iCloners, have you ever wished for an easier way to interact with props in iClone? You know, say, have a 3D Warehouse model or other outside 3D asset react with your avatars the same way that they work with iProps now? (see Online Beta Index – iProps for more info.) Well, with AML Templates your wish is iClones command. Today’s tip takes a look at AML Templates, and first I must point out that they come in two default forms, Functional and Operational. Here’s the difference, Functional Dummies help to execute actions like “Saying Hello” or “Punching someone in the Face,” while Operational Dummies are more for object interactions such as “Sit Here” and “Grab it Low,” that usually have more to do with prop and object interaction.  When you link an object to an Operational Dummy that object then shares the abilities or Operations that the Operational Dummy has. For this example I took a simple AXE weapon prop and had an avatar from the Evil Forces content pack pick it up from a static starting position using the Grab it Low Operation Dummy. Follow the steps below to set up any AML template for use with a prop or watch the high-speed video example provided and the bottom of the post.

  • Load an Avatar into the scene
  • Go to the Set tab
  • Select the Props button
  • Load a Prop you wish to have the character interact with
  • Click the Template tab
  • Locate the AML Template folder
  • Click the Grab it Low template
  • Use the Rotate and Move tools to Align the Helper Node under the Billboard object
  • Double Click the Prop ( in this example the AXE ) to activate it
  • Right Click the Prop to activate the shader menu and choose the Link – Link To option
  • Click the Grab it Low Billboard to link the Prop to the AML Template ( notice a bounding box will flash to indicate a successful link )
  • Right Click the Grab it Low Billboard and then select the Operate – Pick Low option to assign the action to the character
  • Adjust the placement of the Grab it Low Billboard to properly align to the characters hand using the Rotate and Move tools
  • Click Play to review the new AML Template character interaction animation
  • Return to the start of the project and then with the Grab it Low Billboard selected, in the Modify panel under the Display section, select the OFF button

AML Templatesthe Grab it Low Operate Dummy and other defaults are going to make animating your next project a lot easier than your last. When you begin to consider the tons of options you have for character and prop interaction when you implement  these templates, you will see that almost anything is possible. Use these AML Templates along with other features such as Link and UnLink to accomplish some truly innovative and spectacular results, wheither it’s in your next battle scene or virtual news cast or most any other scenario where a prop or two is involved, try for yourself and you will see the power of AML Templates. Below is a small example of how to quickly place and link an object to a Grab it Low Operate Dummy along with a render of this method in action in a short scene. Enjoy!

16
Dec
08

Animate an entire school of fish with Flex Bases in iClone 3.1

Flex Base to Fish Dinner in 30 clicks or less

Flex Base to Fish Dinner in 30 clicks or less

Hello iCloners. Today’s tip is a creative method applied to an interesting concept, imagine this. Sure you’ve seen image planes used to create crowds sitting in stadium seating in games or soldier formations on the battlefield in movies, but stop and think, what if you applied this concept underwater? Today’s tip of the day explains how to Create and animate an entire School of Fish using Flex Bases. This is an image based process where you will only need 2 assets to accomplish this effect, 1 Flex Base and 1 image of a school of fish to become both the Diffuse and Opacity Maps. Here’s how it works, locate an image of the type of fish you would like to use and set that as the Diffuse Map, then in an external image editor, make the fish solid white and the background solid black and apply that as your Opacity Map. Then once in iClone, from the Modify panel for the Flex Base of your choice, activate the Diffuse and Opacity Maps and apply the images to each and simply animate the Flex Base moving through the scene. It’s an easy solution to what could take a lot of time, animating groups of models can really be taxing on your resources, but using only 1 3D model and an image that represents many things at once like a school of fish is the way to go. Follow the steps provided below to create your own animated school for your next underwater scene or watch the high speed video example at the bottom of the post.

  • Go to Set
  • Click the Props button
  • Select the Template Tab
  • Locate the Flex Base folder
  • Double Click on the Square 3 Lines Flex Base
  • Click Play to review the base animation
  • In the Modify Panel, set a value of 90 in the Rotate Y Axis field
  • Strike the F key to place your camera directly in front of the Flex Base
  • Scroll down in the Modify Panel and click the Diffuse Map to activate it
  • Click Open and navigate to your desired file to apply your School of Fish image
  • After it is applied, click Launch to open the image for editing in an external image editor
  • Make any graphic changes you may want, then create an Opacity Map where your fish will be Solid White and the background will be Solid Black
  • Save the file as a new Opacity JPEG
  • Return to iClone
  • If you made changes to the Diffuse Map then click the Update button to apply the changes
  • Click the Opacity Map to activate it in the Modify Panel
  • Click Open and navigate to your desired file to apply your School of Fish Opacity image
  • Click Play to review the fish animation
  • Save your new School of Fish Flex Base by clicking the Add button under the Content Manager
  • Animate the movement of the Fish by using the Move tool
  • Select a start point for the school, then click End to move to the end of the project and Move the Flex Base
  • Click Play to review the school swimming animation

Sure, Flex Bases are preset animated planes in iClone that can help your scene in many different and exciting ways, but when you apply some simple texture techniques and images that help to enhance the natural movement of the prop such as the fluid motion of a fish swimming and a image of a fish applied. It’s a fun way to populate a scene with assets that have life animated into them and thus will help to create a richer, more natural scene for you the producer in the end. To learn more on your own about Flex Bases and the settings that effect them, be sure to check out the Online Beta Index materials. Below is a video example of how to create an entire School of Fish using Flex Bases along with a short render of a small school I added some Deep Water and Bubble  Particle effects to which provided all the elements I needed. I got the animation for the fish from the Flex Base and the Water effects from the default Particle folders, all I needed was some fresh fish. Thanks again Google! Enjoy!

13
Dec
08

Produce a Perfect Orbit Camera with only 3 objects inside iClone3.1

Display 3D Scene wuth perfect camera orbit animation everytime no matter the size or scope of your project

Display 3D Scene with perfect camera orbit animation every time, no matter the size or scope of your project

What up iCloners, today’s tip makes the world go round. Seriously. I am talking about orbit and how you can, Produce a Perfect Orbit Camera in iClone3.1. You can easily showcase and create epic long shots inside of 3D Scenes large or small with this technique and all you really have to do is choose a subject or object to focus on and then build the scene around it and then use this tip to create your Perfect Orbit Camera.

Display more than just 3D scene, create Perfect Orbit Cameras to help brand products and services

Display more than just 3D scene, create Perfect Orbit Cameras to help brand products and services

For product display, nothing beats this method. It will give you a seamless result every time you wish to use this technique without question, and it’s extremely easy to execute. So, why 3 objects? Here’s how it breaks down, you have your subject which you want the custom camera to rotate around 360 degrees, so this is Object 01, then, you have a dummy object that will be placed inside the subject and actually rotated 359 degrees on the Z axis to Link your custom Helper object. The animated rotating 3D Block will be your Object 02. Then another 3D Block will be placed in the scene and a custom camera will be added and linked to this the 3rd object or Object 03 and it will be also known as our Helper object. The reason for this third prop is for the camera to have a node to link to first, but second, it is also there to help control additional camera angles and movement. Follow the steps below to create your own Perfect Orbit Camera animaiton in iClone 3.1 or watch the high-speed video example provided at the bottom of this post.

  • Go to the Set tab
  • Click the Props button
  • Click the Template tab
  • Locate and select the 3D Blocks folder
  • Double Click the Ball_002 3D Block to add it to the scene, this will be Object 02
  • Select the Time Setting Panel button
  • Set an Animation Length to a total of 2000 frames, is it is not set as such already for a 30 second rotation
  • Hit Hotkey: F3 to open the Timeline
  • Set a value of 999 into the Current Frame field to place the time 1 frame before the middle of the project
  • Make sure your Ball_002 is selected, in the Modify Panel set a value of 179 in the Rotate z Axis field
  • Click the End button to move to frame 2000
  • Set a value of 359 in the Rotate z Axis field, the values 179 and 359 ensure that the rotate will occur properly
  • Click Play to review the rotation or scrub the Timeline to see the bounding box and the rotation better
  • In the 3D Blocks folder, Double Click the Box_001 3D Block to add it to the scene, this will be Object 03 or the Helper object
  • Use the Move and Scale tools to position the Box_001 3D Block away from Object 02 and scale it down a bit
  • Right Click the Box_001 prop and select Link – Link To
  • Click the Ball_002 prop to link the Box to the Ball, notice a bounding box will flash to indicate a successful link
  • Click Play to review the rotation, notice the Box will now Orbit around the Ball
  • Load your Custom Prop or subject you wish to create Perfect Camera Orbit around, this will be known as Object 01 ( for this example I use a Globe and Basketball prop to showcase a Scene and a Product )
  • Click the Preview Camera shader from the top right of the view port
  • Select the Add button in the Modify Panel to add a custom camera to the scene
  • Under the Linkage portion of the menu, click the Pick Parent button
  • Click the Box_002 prop to Link the camera to the Helper Object or Object 02, notice a bounding box will flash to indicate a successful link
  • Select the Link to Sub Node icon
  • Check the Align Position to Parent option
  • In the custom camera Modify Panel, locate the Look At portion of the Menu, click Pick Target
  • Select the Custom Prop or Object 01 that you want the Perfect Orbit Camera to focus on
  • Click Play to review the Perfect Camera Orbit
  • In the Scene Manager click Box_001 and then in the Modify Panel, locate the Display portion of the menu and click the Off button
  • Use the Move tool to edit the position of the Helper Object or Box_001 to change the Camera Angles before, during or at the end of the  Perfect Camera Orbit if you wish

Perfect Camera Orbits can assit you no matter if you are selling basketballs or shooting solar systems. They will help to ensure you have that clean and smooth shot that you want to switch to from time to time. For long, slow, dramatic style shots a high angle Orbit Camera is perfect and using the Helper Object to dictate that type of scenario is a easy and highly effective way to produce that custom camera. I used to run into the problem of trying to create a smooth rotation and it would rotate half way around and then rotate back the way it came for the second half of my attempt. I lost more than a few hairs getting it right, but with this method you are sure to knock it out the right way, the very first time. I can promise you that. For a more in depth look into cameras and the basic functionallity they have in your version of iClone, visit the Online Beta Index camera section for yourself to learn more. Below you will find a high-speed build of this method and how you too can use any 3 objects to recreate this in your projects, but I have also included 2 rendered examples of both a 3D Scene and 3D object created with the same project and the same Perfect Camera Orbit. Enjoy!

03
Dec
08

Add Point Lights to your scene to give your characters Skin realistic qualities in iClone3.1

Skin always look better in the Red Light

Skin always look better in the Red Light

Hello there iCloners, today’s tip asks the question…Do you ever feel like your avatars need a tanning bed visit or two? Well, there is good reason for that and a very quick way to change that pale, undefined skin into a rich, and well lit tone. How you ask? Point Lights are the key to producing realistic skin appearances in iClone through the use of colored lights. In iClone the Directional lights default to White and Grey tones, which is a great starting point for any project, but for the users out there that want a more “real world” feel to their projects using a combination of Earth tone based Point Lights and positioning them where the best suit your actors placement in the scene is essential. Follow the steps below to set up 3 Point Lights and one Directional Light or watch the high speed video example at the bottom of this post.

  • Go to the Actor tab
  • Click the Avatar button
  • Select Template or Custom
  • Choose a Character to light, ( for this example I use Ting from the G3 Dream Girls content pack )
  • Use the Zoom and Pan toolsl to get in close on your avatar
  • Scroll down in the Scene Manager and select the color swatch for Directional Light01
  • In the Modify Panel, click the Color Swatch and select a color the matches your desired scene lighting scenario ( for this example a Red Light is used )
  • Click OK
  • Select the Rotate tool and click inside the view port to move the Directional Light, you can use any angle that best fits the project
  • Click the Ambient Color Swatch and select a ambient level that works best for you, a darker scenario is used in this tip
  • Scroll down in the Scene Manager and select the On check box for Point Light01
  • Use the Move tool to position Point Light01 on the opposite side of the angle of the Directional Light
  • Click the Color Swatch in the Modify Panel and select a Deep Brown Earth Tone
  • Adjust the Range slider to a low setting
  • Check Decay to soften the lights edge
  • Scroll down in the Scene Manager and select the On check box for Point Light02
  • Use the Move tool to position Point Light02 on the opposite side of the angle of the Directional Light, this light will be used to enhance the actual Skin Tone
  • Click the Color Swatch in the Modify Panel and select a Tan Earth Tone
  • Adjust the Range slider to a medium setting
  • Check Decay to soften the lights edge
  • Scroll down in the Scene Manager and select the On check box for Point Light03
  • Use the Move tool to position Point Light03 on the same side of the angle of the Directional Light, ( this light is to help define the Red light in the scene )
  • Click the Color Swatch in the Modify Panel and select a Red
  • Adjust the Range slider to a high setting
  • Check Decay to soften the lights edge

Point Lights are great to use for a variety of things other than just creating realistic skin lighting for your characters. The 4 Point Lights provided in the Scene Manager can be used for almost every object in your scene you wish to bring more definition or detail to. When used correctly with Ambient, Directional and Spotlights, Point Lights can help you to achieve professional level lighting situations in a real-time production environment complete with everything from Shadows to Animated Fades and more. To learn more about Point Lights and how they work, and how they will work best for you check out this link to the Online Beta index. Or, sneak a peak at this PG 13 video example of a scene with and without Point Lights added to accentuate the skin of this digital dominatrix. Enjoy…but not too much!


01
Dec
08

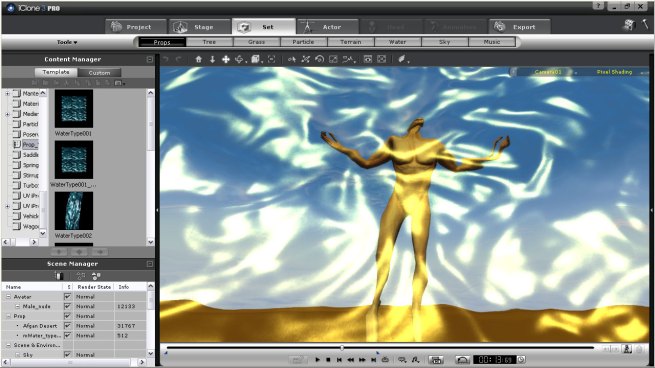
Advanced Camera Lens effects created with Water Props in iClone3.1

Create outstanding effects with Water Props when you use them as animated Lens filters in iClone 3.1

Create outstanding effects with Water Props when you use them as animated Lens filters in iClone 3.1

Hey iCloners, today’s tip is one that you won’t find in the manual or online Beta Index. This is a technique that was stumbled upon while doing a bit of experimenting with Camera Lens Effects using water as a filter. Water Props as a Lens filter? That’s right, sometimes in iClone you can get really creative with the assets that are provided to you and develop some very interesting methods and techniques. Creating Camera Lens Effects with Water Props is one such technique that acts as an animated gel on your custom cameras. This is a very effective way to shoot dream sequences, disorientation, hallucinations and much more. It’s up to you how best to produce your custom shots using this tip, but many artistic ideas can come from trying this technique out for yourself and seeing what cool things you can come up with. To apply Camera Lens Effects using Water Props to your camera follow the steps below or watch the high-speed video example at the bottom.

  • Click the Preview Camera shader from the top right hand corner of the view port
  • Select the Add button to place a custom camera into your scene
  • Click the Set tab
  • Choose the Props button
  • Select the Template tab
  • Locate the Prop_Water folder
  • Double Click the Water_001 prop to place it in the scene
  • In the Modify Panel locate the X Rotate field and set a value of 90
  • Use the Move tool to place the Water Prop directly in front of the camera lens
  • Click Play to review the Water Prop animation to get an idea of the motion
  • In the Modify Panel locate and click the Diffuse Map
  • In the Adjust Color portion of the menu take the Brightness slider down to 0
  • Click the Opacity Map next to make it the active channel
  • Select the Trash Can icon to delete the Opacity Map entirely
  • Click the Reflection Map next to make it the active channel
  • Select the Trash Can icon to delete the Reflection Map entirely
  • Scroll down and check On the Refraction check box
  • Adjust the Refraction slider to a value of 75
  • Click Play to review the edited Water Prop
  • Choose Camera01 from the top right hand corner of the view port
  • In the Transform portion of the Modify Panel, click the Pick Target button
  • Click on the Water Prop to assign the camera to Look At the prop
  • Select the Pick Parent button in the Linkage section of the menu
  • Click on the Water Prop to assign the camera to Link to the prop
  • Double click the Water Prop
  • Begin to move the Water Prop by rotating, notice the camera movement will now follow that prop motion and the Lens effect will always stay in front
  • To save your custom Water Prop filter, click the Add button from the Content Manager

Creating Camera Lens Effects using Water Props is an “outside the box” approach to a fundamental camera technique that is almost as old as photography itself. Using Lens filters, gels, and other muting or enhancement agents to help develop the shot the director or photographer wants to capture is common place and always has been. Why shouldn’t you as a real-time videographer use these same examples in the real-time production environment. The basis for these effects and the creation of them remain the same, but you have a leg up on the other guys because your lens effects can be animated and textured. For more in depth information regarding water visit the Online Beta Index Water page and for a closer look into cameras be sure to give the index a read as well. Below is a high-speed video showcasing this filter in action and the quick-step method of how to create it on your own. Enjoy!

01
Dec
08

Smoothing your camera movements with 1 click in iClone3.1

Smooth your Camera Movements in 1 click with the Camera Movement Smoothing iCon in iClone

Smooth your Camera Movements in 1 click with the Camera Movement Smoothing iCon in iClone

What’s going on iCloners? I hope everyone has had a smooth weekend, and to add to it how about Smooth Camera Movement in only 1 click for your projects? Sound pretty smooth to you? Well it should because in iClone everyone knows you can create up to 16 custom cameras in a scene, and then create custom camera Transform animation for each one as well. This new function will place a key-frame on the Timeline in between your other camera Transform keys, creating a smoother curve to your camera movement. How does it work? Well, first you need to add a camera into your scene and then make as many camera movements as you like, for this example I use 4 camera movements to create a Orbital Camera. When your finished, with the timeline open and the Tranform button clicked, showing your cameras track, locate the new Camera icon with a curved line. You’ll find it right beside the Current Frame field. When you click the icon, it will place the mid-point key-frames between the keys you have just placed. For the best possible result combine Smooth Camera Movement with the camera Look At feature with an animated subject. You can assign the camera to Look At a Parented actor or object in scene, that way the Look At will keep the camera pointed at your subject while smoothing the camera animation at the same time. Follow the simple steps below to create smooth camera movement or watch the high-speed video build provided below.

  • Click the Preview Camera shader from the top left of the view port
  • In the Modify panel select the Add button to place a new camera in the scene
  • After animating your subject, select a starting angle using the Camera Movement tools
  • In the Linkage section of the Modify Panel, select the Pick Parent button
  • Click your animated subject to link the camera to the motion animation you wish to orbit around
  • Use the Pan, Zoom and Orbit tools to create a custom camera rotation
  • Move forward one quarter in your overall project time each time you move the camera (4 or 5 key frames for an Orbit animation in this case )
  • Click the Timeline button from the bottom tool bar
  • Select the Tracklist button to open the list and choose your camera
  • Choose the Custom Camera01 you have placed in the scene
  • Click the Transform tab to drop down the key-frame track
  • Make sure the Transform Track is highlighted by clicking the word Transform
  • Select the Camera Smoothing button to the left of the Current Frame field
  • In the Modify Panel scroll down and locate the Look At portion of the menu
  • Click the Pick Target button
  • Select the object in the scene you wish the camera to Look At
  • Click Play to review your new custom Smooth Camera Orbit
  • Repeat for any other custom camera and movement you wish to smooth

The Smooth Camera Movement button is one of the little known iClone features that seems to get past over by many users. There is a small trick to activating the icon which is selecting the Transform track first in order to activate the icon itself. Otherwise, it almost seems to be some sort of Timeline hieroglyphic or useless graphic, but in fact it is an almost hidden solution to sometimes less than perfect camera animation. This will automatically help to smooth your cameras obviously, but it also will help to correct curves and “crane” style camera angles to make them more pleasing for your users to view. For a more in depth look at Operating Cameras and Camera Transform Tools be sure to check out the Online Beta Index. Every aspect of iClones Camera abilities can be found there. Below is a video comparison of the same exact scene rendered once with Smooth Camera Movement on with Look At applied, and once with it off and without Look At applied to show how it can effect your camera animation and a showcase of how to animate a camera then apply the Smooth Camera Movement with only 1 click. Last week an iClone Training Course was held for 5 users who were shown this technique in conjunction for the C3 Coolclones relaunch, they had great things to say about this feature, you will too after you give it a try. Enjoy!